Hmm... I am offering my help. Jesus helped people, right? So, in a way, I'm following Jesus' example -- using technology. Hey, that's it! Yeap, it's not so off topic after all. That's my story, and I'm sticking to it. Anyway, enjoy...
I researched most of this online and also stumbled across a few tidbits here and there by experimenting myself. I've gone ahead and documented my migration all the way through, and I hope the following information will be of use to anyone who wishes to tie their online identity to a new Google Account. I'm quite happy to say that the transition is fairly seamless and easy to do if you follow the correct steps that I'll be outlining here. At the end of all this, you will have all (or most) of your Google Account associations and preferences tied to your new Google Account username. I will also show you how to consolidate all of your e-mail addresses into one Gmail Inbox, including how to forward your Yahoo! Mail for free (or how to get free POP Yahoo! Mail access) and how to send and receive your Hotmail e-mail from within Gmail as well.
The full guide is available after the jump...
Transfer / Migrate from Gmail to Gmail
Currently, it's fairly easy to import e-mail from other e-mail accounts. In Gmail, under Settings > Accounts and Import, you can import mail and contacts from Yahoo!, Hotmail, AOL and other webmail or POP3 enabled accounts. Oddly enough, Gmail is not listed because Google doesn't "officially" support migrating from one Gmail account to another.
But I have some good news! Although undocumented, there is a way to import all of your e-mails from your old Gmail account to your new one. There are a few basic steps that you will need to take:
- Configure POP Access for Old Gmail
Disable any current POP e-mail programs that may be accessing your old Gmail address (Outlook, Thunderbird, etc). This is to ensure that no e-mails are marked as "retrieved" during the import process. The best sure-fire way to do this would probably be to change your old Gmail's password so that programs with access that you may have forgot about can no longer fetch e-mails.
Then, in your old Gmail account, go to Settings > Forwarding and POP/IMAP and select "Enable POP for all mail (even mail that's already been downloaded)". This will allow you to import all of your e-mail into your new Gmail account, keeping all dates and timestamps intact!
- Enable POP Retrieval in New Gmail Account
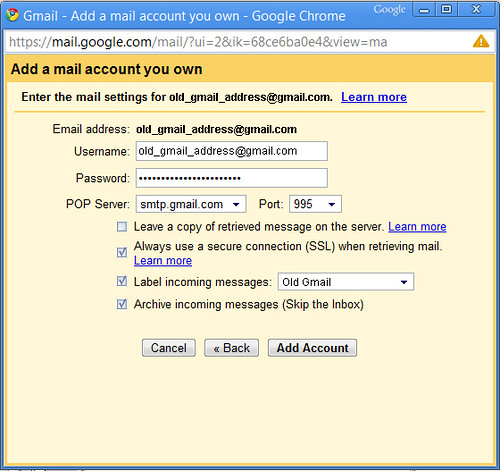
Login to your new Gmail account and go to Settings > Accounts and Import and add a new POP3 e-mail account. Using the settings documented here, we can bypass Google's restriction of importing from Gmail to Gmail.
The settings are pictured below, but basically, you must use your full e-mail address (including @gmail.com) as the username and to leave smtp.gmail.com as the POP server (not pop.gmail.com).
Click Add Account and let it do it's thing. It will take some time (it took about 2 days with 15k e-mails for me), but once it's done, we can "flip the switch". You can check its status by going to Settings > Accounts and Import in your new Google account and clicking on View History. Once you see "No mails fetched." a couple of times, then it's done importing and we can "flip the switch".
- Flip the Switch
Once everything is done transferring, I'm going to recommend that you delete the "Check mail using POP3" account. Why? Because we're going to have all mails from now on be forwarded from your old account to your new one. This is so that e-mails arrive instantly, instead of waiting on the POP3 checker to poll your new account. This also ensures that the newly enabled Push access to Gmail is actually Pushed and not delayed by POP3 checking.
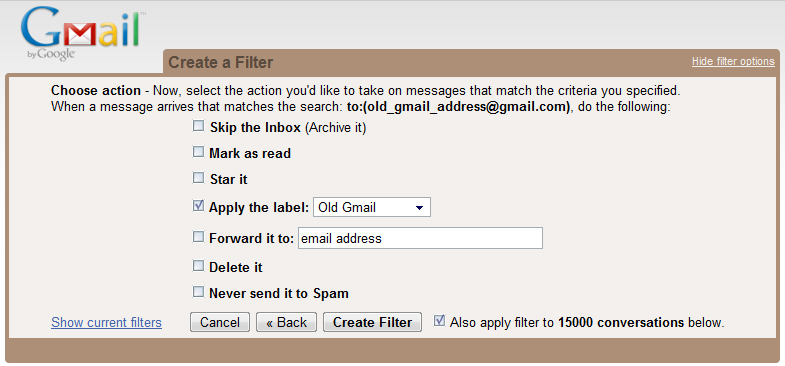
So, in your new Gmail account, go ahead and click "Delete" under Accounts and Imports in Settings for your old Gmail account. Then, login to your old Gmail account and start forwarding all of your mail to your new Gmail account. You can do this by either using the Forwarding option under "Forwarding and POP/IMAP" in the Settings panel, or by creating a filter. I recommend the filter method because it gives you more control over how the e-mail is handled on the old account.
For example, I wanted to have my old Gmail account retain all the e-mails in the inbox, but I wanted them marked as read and labeled "Forwarded" (not possible with the standard Forwarding option). So I created the following label:
The asterisk (*) in the From field means that we want to filter messages that are from anybody (ie: all mail).
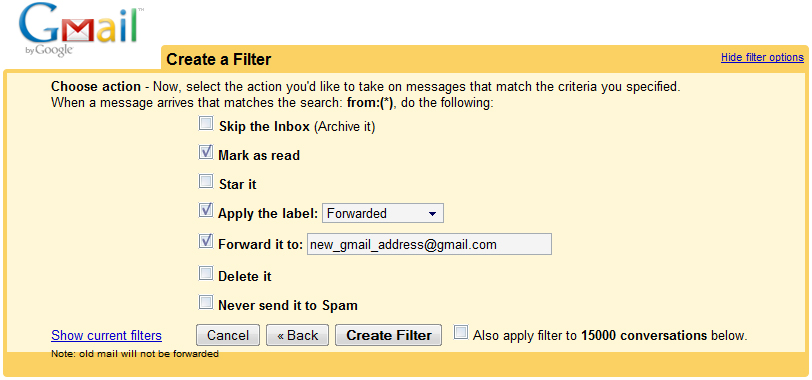
We want this filter to keep the e-mails in the inbox, mark them as read, label them as "Forwarded" and forward them to the new Gmail address.
In the new Gmail account, we can then create a "catching filter" that will label all e-mail that was sent to the old Gmail account so that we can differentiate which e-mails were sent where. This is especially useful when you begin to consolidate all of your e-mail accounts into one Gmail inbox (detailed later in this post).
That's it! That is arguably the most difficult part of this whole process, but even that wasn't too bad. Now we can begin migrating all of our Google Account associated permissions and make your new account feel like home again.
UPDATE: It looks like Google has recently allowed importing from one Gmail account to another using the standard Import tool in Gmail. You can try this for yourself as I haven't had a chance to test it out, but if not, you could do the longer process outlined above.
Migrate One Google Account Permissions to Another Google Account
Now that our e-mail is all spiffy and such, we can then transfer the various Google Account permissions to our new account. This is usually fairly straightforward, so I'll be concise, but If you have any questions or difficulties, be sure to post in the comments, I'd be happy to help.
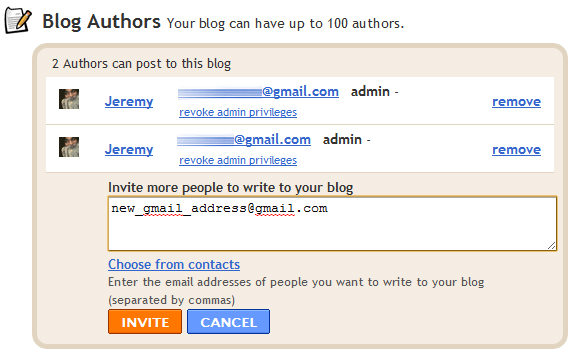
- Transfer Blogger Account
To transfer your blogging permissions, all you need to do is login to the Blogger.com Dashboard and then, under the blog you want transferred click on Settings > Permissions > Add Authors. Then simply add your new Gmail address there and assign Admin Privileges. Easy schmeezey!
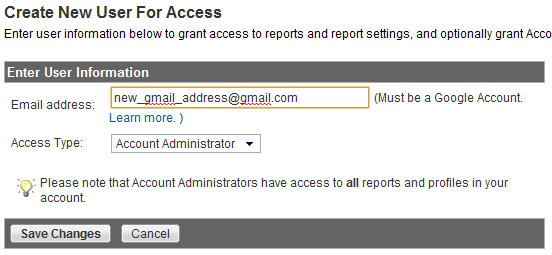
- Transfer Analytics Account
This one is even easier, just click to add a new user for access on the main Google Analytics page.
- Transfer iGoogle and Google Reader Subscriptions
Another easy one, you can export and then import your iGoogle and Google Reader subscriptions from your old account into your new one. You'll lose some settings such as previously starred and tagged items (in Google Reader), but I'd say it's a small price to pay.
- Transfer FeedBurner Account
This one is a bit more "permanent" than the others, since it actually transfers access rights to the new account (instead of allowing additional access), but it works just the same.
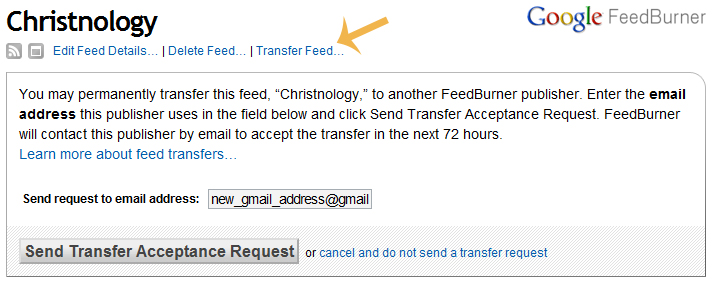
On the main FeedBurner page, click "Transfer Feed ..." and enter your new Gmail address. You'll have to click through the e-mail that is sent to initiate the transfer within 72 hours.
- Transfer AdSense Account
Unfortunately, I am not aware of any way to transfer AdSense Accounts, however you can enable Reporting Views under Blogger if that is what you use AdSense for. Otherwise, your best bet is to just create a new AdSense account and re-associate your Ads, not a big deal and invisible to your end-user. Still, you always have the option of using your old Gmail account for AdSense / Analytics access since Google usually re-prompts for login credentials when accessing these portals anyway.

Personally, I opted to enable the AdSense Reporting View from Blogger while logged in to my new Gmail account. Upon entering the information pictured, you'll receive a verification e-mail asking you to allow access for Blogger to see your AdSense information. Once you verify there, you should be able to see your AdSense reports right from Blogger like you could with your old account.
Transfer Google Account Preferences and Settings to Another Google Account
Now that we have the proper permissions, we can begin to transfer over all of our preferences and settings to the new Google account. This step is usually self-explanatory (you're basically utilizing any Import/Export options available), so I'll detail the two most popular as an example.
- Gmail Filters
Since you'll be forwarding all of your mail from your old Gmail to your new one, it makes sense to have the same filters in place. Luckily, you don't have to manually create these.
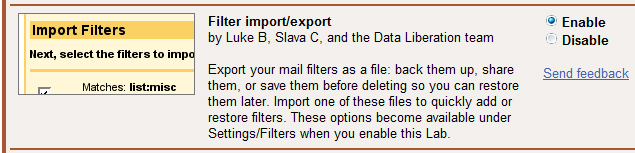
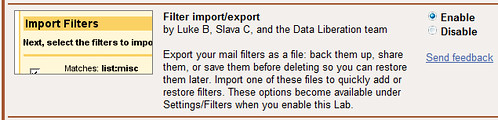
Head on over to the Labs page in Gmail and enable the "Filter import/export" labs feature.
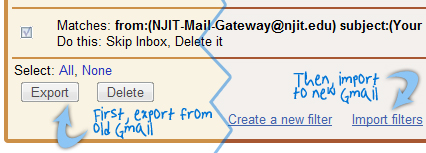
Then just go to your Filters page in your old account and select the filters that you want to explort and click "Export". This will create a downloadable file with all of your filters ready for import to your new Gmail account. Login to your new Gmail account, go to the Filters page and scroll down to click on the "import filters" link and select that file. Now all of your filters are ready to go, nice!
- Google Reader / iGoogle RSS Subscriptions
Your Google Reader and iGoogle RSS subscriptions work much the same way as the Gmail filters procedure. Just select to export your filters from your old account and then import into your new account. Unfortunately, this only works for transferring your subscriptions. I currently don't know of any way to transfer your followers or people you were following, or how to transfer your shared / starred items. Of course, you could always subscribe to them from your new account so that you have a reference should you need to look something up.
- Google Docs
Transferring Google Docs is fairly simple. You just bulk export from your old Google Docs account to create a file that you save on your hard drive. Then you bulk import into your new Google Docs account and everything is transferred. The permissions and sharing settings will most likely need to be transferred manually, however.
- Google Contacts
Contacts import/export work much the same way, just be sure to select Google CSV to ensure maximum compatibility when importing into your new Google Account.
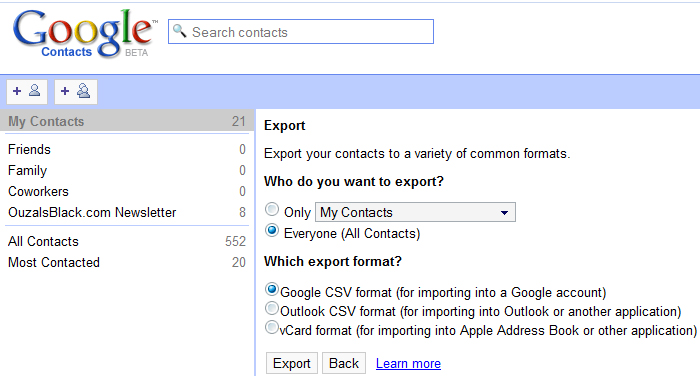
One thing you will lose during the transfer are the pictures assigned to each contact, I don't know of any way to carry those over currently. Maybe some round-about way with your smartphone or something, but that's up to you to decide if it's worth the hassle.
Consolidate Your Inbox with Gmail
Access Hotmail from Gmail for Free
I would have liked to have Hotmail forward all of my e-mail to my new Gmail address so I get them instantly, but unfortunately, Hotmail does not allow you to forward mail to other free e-mail accounts (only custom domain names). If you have a Google for Your Domain Account, then you're in luck and you can just enable forwarding in mail.
For the rest of us, however, there is some good news. Hotmail recently allowed free POP access to their accounts worldwide, so we just have to configure Gmail with the proper POP3 retrieval settings.
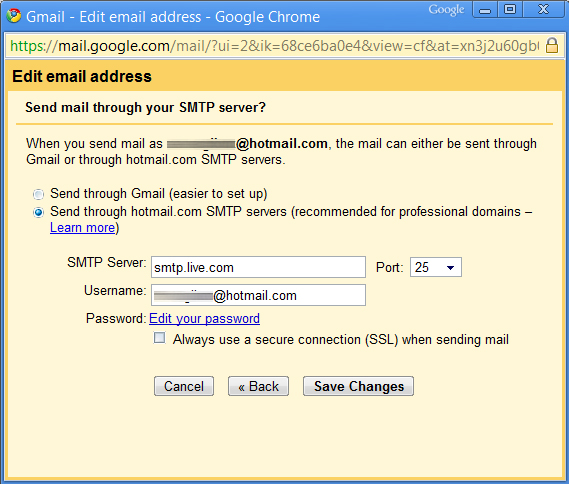
You can follow the pictured settings below (basically, username is the full e-mail address, POP server is pop3.live.com on Port 995 using SSL):

You can also send e-mail using Hotmail's SMTP server, smtp.live.com on Port 25. Using Hotmail's server instead of Gmail's built-in server avoids the "on behalf of" ugliness. Also, "Always use secure connection" must be unchecked, or Gmail won't be able to connect for some reason.
Access Yahoo! Mail via Forwarding or POP from Gmail for Free
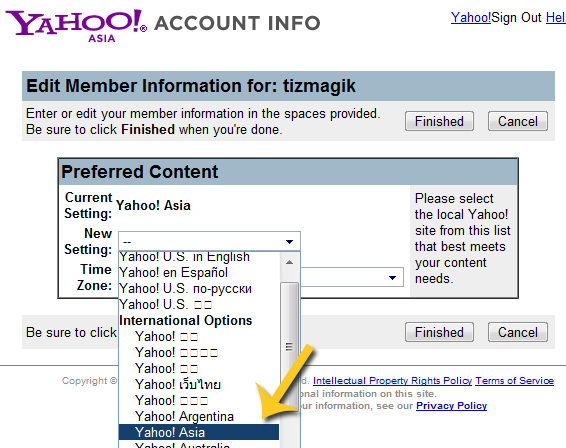
Yahoo! is a bit trickier. Unfortunately, reports of Yahoo! soon opening up and allowing free POP access have all but quieted down as of late. After some research, I came across this post and learned that Yahoo has enabled free POP access in certain regions. So, apparently setting your preferred content to Asian should do the trick.
Here's how to do it: Change your Yahoo! Preferred Content settings to Yahoo! Asia by following this link.
Now, you can login to your Yahoo! Mail and go to Options > Mail Options > POP & Forwarding and then click Setup or Edit POP & Forwarding.
At this point, you can set up Yahoo! Mail for POP access and then enter the POP settings (pictured) in your new Gmail account.
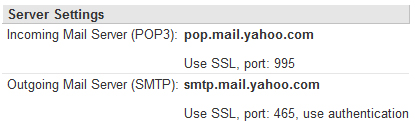
Gmail will then begin the import process, bringing over all of your Yahoo! Mail with dates and timestamps intact. After the import is done, again, I recommend you setup Yahoo! Mail for Forwarding (instead of POP access) so that e-mails arrive instantly. The downside with this, however, is that Yahoo! deletes e-mail that is forwarded. So if you would rather retain an archive in your Yahoo! account, I'd keep the POP setting and live with non-instant e-mail delivery.
Now for some bad news: Yahoo! currently does not support TLS and therefore you cannot setup Gmail with Yahoo!'s SMTP settings to send mail from your Yahoo! address without the "on behalf of" stickler. There are reports that Google is working with Yahoo! to resolve this, but I wouldn't count on it.
Now that all that is done with, you can see the bird's eye view of your account and all of its associations and data form the new Google Dashboard page.
And that's it! If you have any questions or have some experiences to share, please post in the comments below.
(Pic Credit)


Related Posts